Northern Circuit at a glance
Spend nine mountain days exploring Kilimanjaro from its western forest approach to the quieter northern slopes. The Northern Circuit suits travellers who want a longer camping expedition, broad views around Kibo and more time on the mountain before the summit ascent. Its appeal is the journey as well as the destination.
Why choose Northern Circuit?
- More days before the summit
- Nine mountain days provide additional time at altitude before the summit attempt. The benefit comes from the staged itinerary, not simply adding distance.
- A quieter view of Kilimanjaro
- After crossing the Shira Plateau, the route turns towards Moir and the northern traverse. These middle stages offer a different atmosphere from the busier southern circuit and avoid the Barranco Wall.
- For those who value an extended expedition
- Choose this route if you can make room for nine mountain days and enjoy consecutive days of walking and camping. The longer circuit adds variety and time, while the summit stage remains a major effort.
Extra time supports acclimatisation; it does not guarantee a summit. Read our altitude and acclimatisation guidance →
- Mountain time
- 9 trekking days · 8 mountain nights
- Approach & finish
- West, then north approach · Mweka Gate finish
- Summit
- Uhuru Peak · 5,895 m
- Sleeping
- Camping
- Trail atmosphere
- Quieter northern traverse
- Physical demand
- Challenging; longest itinerary here
Needs more time and usually a larger overall budget. The summit stage is long; extra days do not guarantee reaching the top.
Mountain days run from the first trailhead walk to the exit gate, including acclimatisation days. Arrival, hotel preparation, post-climb rest and departure are additional.
The route on the mountain
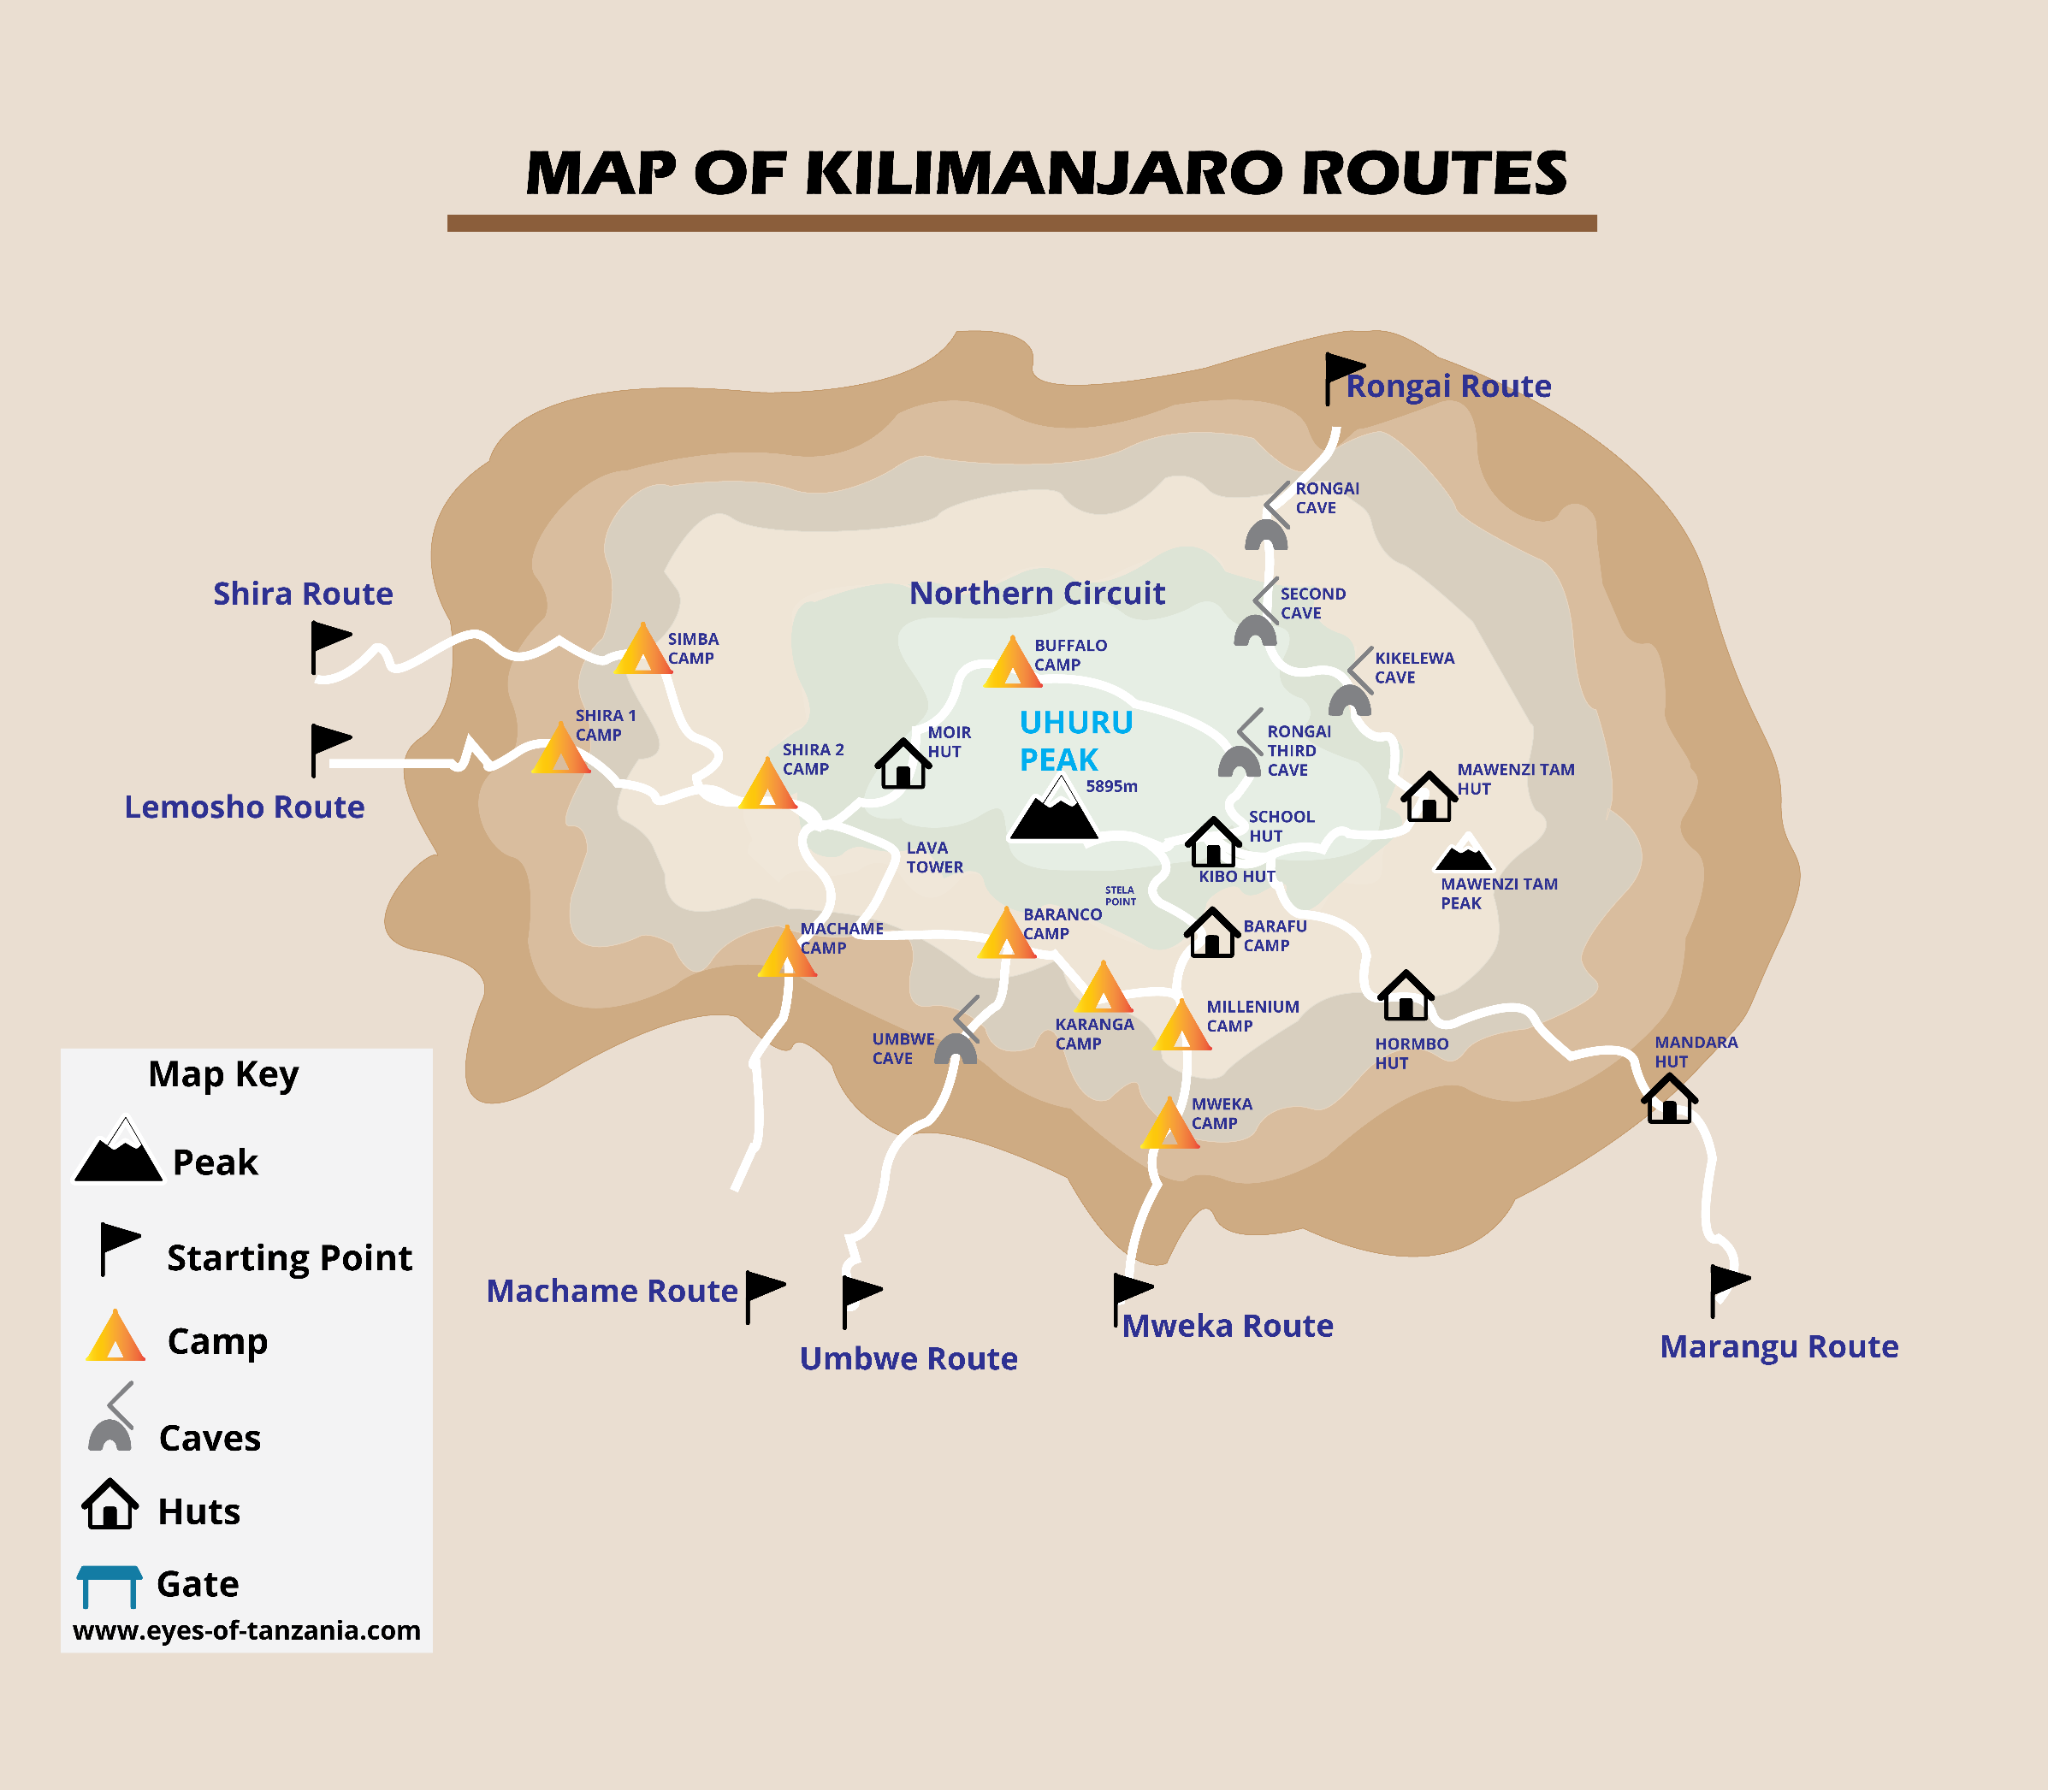
Company schematics provide orientation, not navigation instructions. Hut icons and artwork labels do not define booked sleeping arrangements.
9-day Northern Circuit itinerary
A detailed sample mountain itinerary, to help you understand the experience before agreeing your operating schedule.
Elevations, distances and times are approximate planning figures, not promises. Published camp elevations vary; pace, weather, trail choice and acclimatisation outings change the day. The team confirms camps and stages before booking.
- Mountain day 1
Lemosho trailhead → Mti Mkubwa
Transfer directly to Lemosho Glades for entry formalities, then begin walking under the forest canopy. This is a deliberately modest first stage: settle into the guide’s pace, adjust your pack and protect your dry layers from afternoon showers. Camp is still surrounded by trees. Trailhead access and starting elevation depend on road conditions.
- Start
- ≈ 2,360 m
- Finish
- ≈ 2,895 m
- Distance
- ≈ 6 km
- Trekking time
- 3–4 hours
- Habitat
- Montane forest
- Overnight
- Mti Mkubwa camp
- Mountain day 2
Mti Mkubwa → Shira 1
The forest gives way to heather, exposed grass and volcanic ground. The climb onto Shira Ridge makes this a more sustained walking day than yesterday. On reaching the plateau, the space opens dramatically and Kibo can appear across the grassland when the weather clears. Keep wind and sun protection readily accessible.
- Start
- ≈ 2,895 m
- Finish
- ≈ 3,500 m
- Distance
- ≈ 8 km
- Trekking time
- 5–6 hours
- Habitat
- Forest → heath & moorland
- Overnight
- Shira 1 camp
- Mountain day 3
Shira 1 → Shira 2
Cross the broad Shira Plateau rather than making a direct rush towards the summit. The shorter main walk leaves time to eat, recover and notice how you feel at a higher sleeping altitude. Any additional acclimatisation walk is a guide-led choice; it is not a compulsory mileage target.
- Start
- ≈ 3,500 m
- Finish
- ≈ 3,810 m
- Distance
- ≈ 7 km
- Trekking time
- 3–4 hours
- Habitat
- Heath & moorland
- Overnight
- Shira 2 camp
- Mountain day 4
Shira 2 → Lava Tower → Moir
Leave the plateau for the higher Lava Tower area, then turn towards Moir rather than descending into the southern Barranco Valley. This marks the change to the northern journey. The Lava Tower detour and exact camp approach influence distance; the team should confirm the final stage rather than treating one published kilometre figure as universal.
- Start
- ≈ 3,810 m
- Finish
- ≈ 4,205 m
- Reported high point
- ≈ 4,630 m
- Distance
- ≈ Stage distance varies with detour
- Trekking time
- 5–7 hours
- Habitat
- Moorland → alpine desert
- Overnight
- Moir camp
- Mountain day 5
Moir → Buffalo camp
Cross the less travelled northern slopes, with long views away from the busier southern circuit. The ground undulates, so a slightly lower sleeping camp does not mean a simple downhill day. Optional high walks near Lent Hills and the exact path are guide decisions. Wind protection and steady pacing remain important.
- Start
- ≈ 4,205 m
- Finish
- ≈ 4,020 m
- Distance
- ≈ 12 km
- Trekking time
- 5–7 hours
- Habitat
- Alpine desert
- Overnight
- Buffalo camp
- Mountain day 6
Buffalo camp → Third Cave
Continue the northern traverse beneath Kibo. The rhythm is a sequence of open slopes and valleys rather than one continuous summit climb. This quieter middle section is one of the route’s main attractions, but it is still remote mountain terrain. Arrive at Third Cave and prepare for the next move to a much higher camp.
- Start
- ≈ 4,020 m
- Finish
- ≈ 3,870 m
- Distance
- ≈ 8 km
- Trekking time
- 5–7 hours
- Habitat
- Heath & moorland
- Overnight
- Third Cave camp
- Mountain day 7
Third Cave → School Hut
Climb towards the eastern summit approach across increasingly bare ground. The stage is short on the map but gains substantial sleeping altitude. Camp near School Hut, organise summit clothing and eat early. The word “hut” names the area; this guide describes a camping itinerary, not an automatic indoor bed allocation.
- Start
- ≈ 3,870 m
- Finish
- ≈ 4,755 m
- Distance
- ≈ 5 km
- Trekking time
- 4–5 hours
- Habitat
- Alpine desert
- Overnight
- School Hut area · camping
- Mountain day 8
School Hut → Uhuru Peak → Mweka
Start in darkness towards the eastern crater rim near Gilman’s Point, then continue around the rim towards Uhuru if the guide’s assessment permits. Descent joins the southern side towards Barafu and continues to Mweka. This is the longest and most demanding stage of the journey; extra days beforehand do not remove the need to manage cold, fatigue and symptoms.
- Start
- ≈ 4,755 m
- Finish
- ≈ 3,070 m
- Reported high point
- 5,895 m
- Distance
- ≈ 6 km up + 12 km down
- Trekking time
- 7–9 hours up + 4–6 hours down
- Habitat
- Alpine desert → summit zone → forest
- Overnight
- Mweka camp
- Mountain day 9
Mweka camp → Mweka Gate
The final trail returns through wetter forest and can be muddy even after dry days higher up. Take care on roots and slippery steps. At the gate, complete park formalities and meet your transfer. A shower, a proper rest and a separate hotel night make a better finish than squeezing a long journey into the same afternoon.
- Start
- ≈ 3,070 m
- Finish
- ≈ 1,640 m
- Distance
- ≈ 10 km
- Trekking time
- 3–4 hours
- Habitat
- Montane forest
- Overnight
- Off the mountain; hotel separately arranged
Elevation & acclimatisation
The nine-day journey adds time and a northern traverse. Sleeping altitude falls slightly from Moir through Buffalo to Third Cave, then rises substantially to School Hut. The chart shows those overnight changes; it is not a guarantee of adaptation or a continuous terrain profile.
This joins published overnight values. It is not a GPS track, continuous terrain profile or assessment of medical safety.
Fitness does not protect against altitude illness. A slower ascent can help adaptation, but any Kilimanjaro itinerary still reaches very high altitude. Report symptoms promptly and follow your guide’s decisions; never continue higher with worsening symptoms.
Understand altitude before you climbCamps, huts & mountain nights
Eight nights in mountain tents, including the exposed northern camps and the School Hut area.
Confirm camping support for the northern traverse, water logistics and emergency descent arrangements. Shared summit and descent areas can be busier.
What mountain accommodation is really likeThe landscapes you’ll cross
- 01Lemosho forest and the Shira Plateau.
- 02Volcanic slopes around Lava Tower and Moir.
- 03Open northern moorland, valleys and views across the plains.
- 04The eastern crater approach, summit rim and Mweka forest descent.
What to know before choosing
- This is the longest sample itinerary here, with more mountain nights and generally a higher total trip cost.
- The northern traverse avoids the Barranco Wall, but the summit stage remains severe.
- The Moir stage can differ between operators; this outline includes the Lava Tower detour.
Prepare for this route
Practise consecutive walking days, camping routines and long descents. Take enough dry layers for a longer expedition while keeping within the agreed duffel allowance. Confirm charging and spare-battery plans for nine days away from the hotel.
What your climb quote should cover
Request a personalised quote for this route, based on your group size and preferred dates.
Confirm in the mountain package
- Park fees and camping arrangements.
- Guides, porters, cook, mountain meals and drinking-water treatment.
- Tents, sleeping mats and dining / toilet equipment.
- Emergency equipment, monitoring and descent arrangements.
- Hotel nights, airport transfers and trailhead transport.
Budget separately unless included
- Flights, entry documents and appropriate travel insurance.
- Personal kit, sleeping bag and any gear rental.
- Crew tips and personal spending.
- Extra hotel nights, itinerary changes and extensions.
These are quote-checking categories, not confirmed company inclusions. Request a written itemisation and booking terms.
Plan my Northern Circuit climbUnderstand the full climb budget